
Digital Ocean
Deploying the platform on to DigitalOcean
DigitalOcean offers a compelling combination of affordability and simplicity, making it a great choice for hosting applications like the General Intelligence Platform. Key benefits include:
Cost-Effectiveness: DigitalOcean provides competitive pricing with transparent billing, allowing you to scale your resources (and costs) as your platform grows. You only pay for what you use.
Simplicity: DigitalOcean's user interface is clean and intuitive, making it easy to manage your infrastructure, even if you're not a cloud expert.
Scalability: You can easily scale your application's resources (CPU, RAM, storage) up or down as needed, ensuring optimal performance and cost efficiency.
Step 1: Create a DigitalOcean Account
Sign Up: Navigate to the DigitalOcean website: https://www.digitalocean.com/
Create an Account: Click the "Sign Up" button and follow the on-screen instructions. You'll need to provide your email address, choose a password, and potentially verify your email.
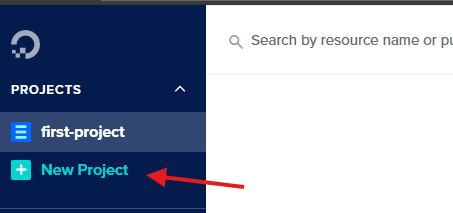
Step 2: Create a New Project
Organizing your resources into projects helps keep things manageable.
Navigate to Projects: In your DigitalOcean dashboard, find the "Projects" section (usually in the left-hand navigation menu).
Create a New Project: Click the "Create Project" or "New Project" button.
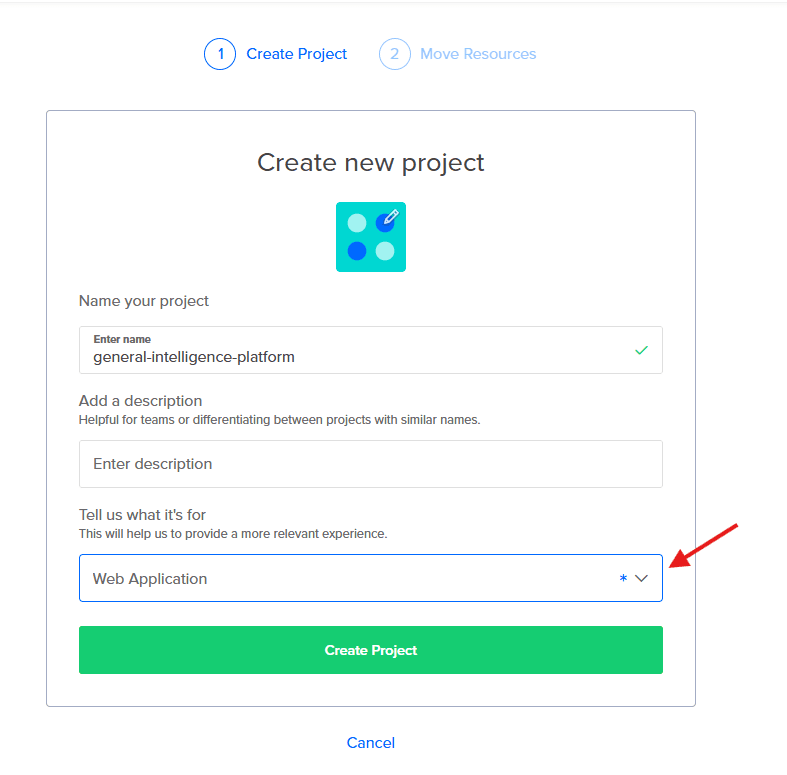
Project Details:
Name: Enter general-intelligence-platform (all lowercase, with hyphens as separators). This is important for consistency.
Description: (Optional) Add a brief description, such as "Deployment environment for the General Intelligence Platform."
Purpose: "Web Application"
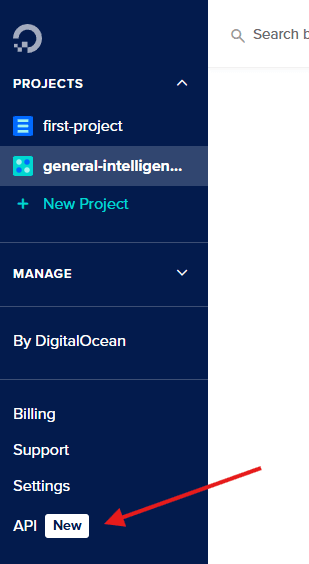
Step 3: Generate an API Key
An API key allows your application (or deployment scripts) to interact with DigitalOcean's resources programmatically.
Access API Settings: In your DigitalOcean dashboard, click the "API" link in the left-hand navigation menu.
Generate New Token: Click the "Generate New Token" button.
Token Configuration:
Token Name: Enter general-intelligence-platform. This helps you identify the key's purpose later.
Expiry: Select "No Expiry".
Select Scopes: Select "Full access"
Generate Token: Click the "Generate Token" button.
Copy and Secure Your Token: DigitalOcean will display your API key only once. Copy it immediately and store it in a secure location, such as a password manager. You will not be able to retrieve it again. If you lose it, you'll need to generate a new one.

Last Updated: